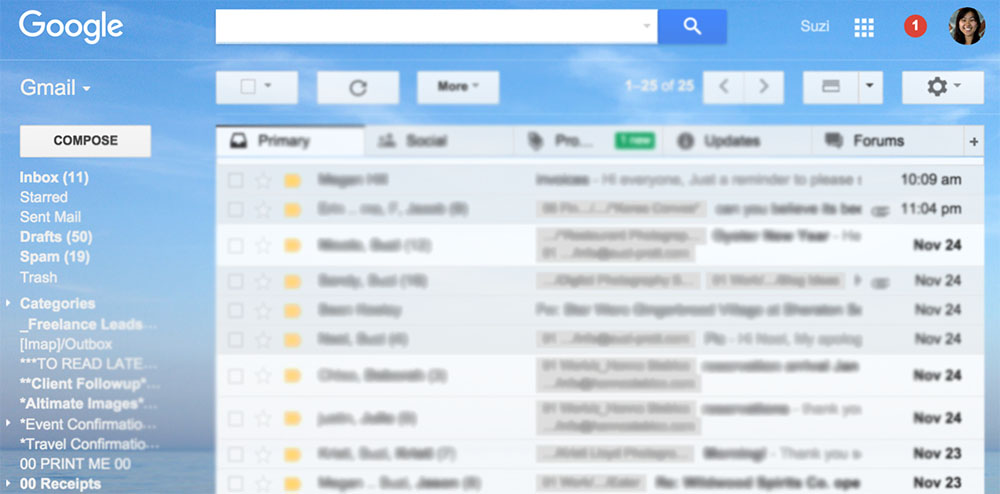
How many unread emails do you have in your inbox? If you’re like most, that number is probably SCARY big, like in the tens of thousands. Let me show you how many unread emails are in my inbox:

Eleven. And these are emails I still consider “in-work” projects, so they have been read; I leave them unread to remember that they are priority tasks. I’m not telling you this to brag about how clean my email inbox is, but rather to demonstrate that an almost zero unread inbox is possible, and how a cleaner email inbox can be one of the best ways to handle your productivity. This is especially key if you, like me, use Gmail for both personal AND professional correspondences. If you’re not careful, this blending of email can be overwhelming and lead to a loss of productivity (especially when you start losing important client emails! speaking from experience, sadly).
These are some tips that have simplified my email box over the past 3 years I’ve been a self employed freelancer.
Start by mass unsubscribing from emails you don’t read.
One of the biggest culprits of increasingly huge inboxes is email marketing and newsletter subscriptions. They appear at regular intervals, and more often than not go unread, causing mass pileups. So the first way to start reducing inbox clutter is to unsubscribe to newsletters you don’t read. To help expedite the unsubscribing process, consider using a tool called Unroll.me which lets you mass unsubscribe.
Watch out for stray subscription emails
Sometimes Unroll.me doesn’t quite subscribe you from every email list, and you may get stray subscription emails in your inbox. I’ve found the best coping mechanism in this case is to simply manually unsubscribe from these emails, or simply Mark as Spam to have them automatically funneled into your Spam box. If you manually unsubscribe, aim to tackle just a few a day to make it manageable.
Use multiple email addresses.
Another easy way to control your emails is to use multiple email addresses. This is especially important if you’re a self employed freelancer. Be sure to have at least two separate emails: one for work and one for personal emails. This will help moderate your work-life balance. Beyond these two basic emails, you could also add one extra email address: the one that you use to sign up for newsletters, marketing offers, and other commercial, impersonal emails. This way, you’ll only see those emails when you log into that account and they won’t clutter your important, personal emails.
If you use Gmail, be sure to utilize these key features to help you use multiple email addresses:
a) Send mail from a different address
This feature allows you to use Gmail to send messages with another email address listed as the sender. For example, I only ever sign into one Gmail account (suzipratt@gmail.com), but using Send mail as, I can use this same account and send emails from another email address that I own such as info@suzi-pratt.com. You can add up to 5 other email accounts. The instructions to do so are listed below, according to Google.
1. Click the gear in the top right .
2. Select Settings.
3. Click the Accounts and Import tab.
4. Under Send mail as, click Add another email address.
5, In the ‘Email address’ field, enter your name and alternate email address you own.
6. Enter the SMTP server (e.g. smtp.domain.com), your username on that domain, and your password for that account. You may also need to adjust your port setting or SSL setting (talk to your other ISP if you need this information).
7. Click Add account >>
8. Open your other account and either click the link in the message Gmail sent or enter the confirmation code in the Accounts and Import section of your Gmail settings.
9. If Gmail sent a verification email and you didn’t receive it, try checking your Spam or Bulk Mail folders for a message from account-verification-noreply@google.com to see if the email ended up in there.
b) Check email from other accounts using Gmail
If you set up multiple email accounts, you can set it up so that all of the incoming emails for these accounts show up in just one inbox. I take MAJOR advantage of these feature and usually have at least 7 different email addresses all funneling into one inbox. This allows me to have an email address like info@suzi-pratt.com (my primary business email), yet be able to send and receive messages from my personal email address (suzipratt@gmail.com). The steps for doing this are a bit lengthy and they are detailed below as described in the Google support forum.
First, change your settings in your other account:
1. Open the Gmail account you want to import from.
2. At the top right, click the gear Settings.
3. Select Settings.
4. Select the Forwarding and POP/IMAP tab.
5. In the “POP Download” section, select Enable POP for all mail.
6. In the drop-down menu next to “2. When messages are accessed with POP,” choose what 7. to do with messages in this account, such as keep Gmail’s copy in the inbox (recommended).
8. At the bottom of the page, click Save Changes.
Then, change your settings in your new account:
1, Open the Gmail account you want to import to.
2. At the top right, click the gear Settings.
3. Select Settings.
4. Select the Accounts and Import tab.
5. In the “Check mail from other accounts (using POP3)” section, click Add a POP3 mail account you own.
6. Enter the full email address of the other account, then click Next Step.
7. Enter your password. If you use 2-Step Verification, you’ll need to enter a new app password.
8. Now you have a few options to choose from. Here’s our recommended settings:
9. Leave a copy of retrieved messages on the server – Leave unchecked. This setting is controlled in the POP settings of your other account.
10. Always use a secure connection (SSL) when retrieving mail – Keep checked.
11. Label incoming messages – Check the box if you’d like to easily see which emails in your inbox came from this account.
12. Archive incoming messages – Leave unchecked. Only check if you don’t want to see new messages from the other account in your inbox.
13. Click Add Account. If you get an error message while getting set up, click the Show error details link to find out more about what’s not working.
14. Once your account has been added successfully, you’ll be asked if you want to be able to send mail as this address. This lets you compose messages in Gmail, but have them appear to be sent from your other email account.
Categorize the types of emails you regularly receive.
The latest iterations of Gmail aim to help you sort through emails by automatically categorizing and filtering incoming messages into tabs such as Primary, Social, Promotions, Updates. Unfortunately, Gmail does this filtering automatically and there’s isn’t a way that I know of to customize these filters. On the bright side, I do find that Gmail filters are pretty accurate, but it helps to add a few of your own. Specifically, I make sure to add the following Labels (Gmail’s version of folders) to better sort my emails for easier access:
- New Client Inquiries
- On-Going Client Emails
- Business Expense Receipts
- Travel Confirmation Emails
- Personal Emails
- Promotional Emails
- a personal label or folder for any client I work with long term
Do one of these four things after you receive new email
A new email that lands in my inbox ends up in one of four places:
- Dumped in the trash can
- Marked as Spam
- Moved into a custom Label (examples above)
- Kept in my Primary inbox and marked as Unread to indicate it as a priority.
Use Canned Responses to quickly reply to priority emails
Use your Primary Inbox as a to-do list
There is lots of advice out there that says this is a bad strategy, but I find it to be highly productive for the way that I work. The idea here is to keep all of your on-going or super important emails in this inbox. mark highly IMPT emails as unread; keep other “on-going emails” in this box that are not yet closed or resolved.
Take advantage of Gmail’s Canned Responses feature
Do you frequently write the same email text over and over when responding to inquiries? If so, you can save yourself a ton of time by creating and inserting Canned Responses. The initial process for activating and setting up Canned Responses is a bit lengthy, so I will refer you to WikiHow for steps on setting up this feature.
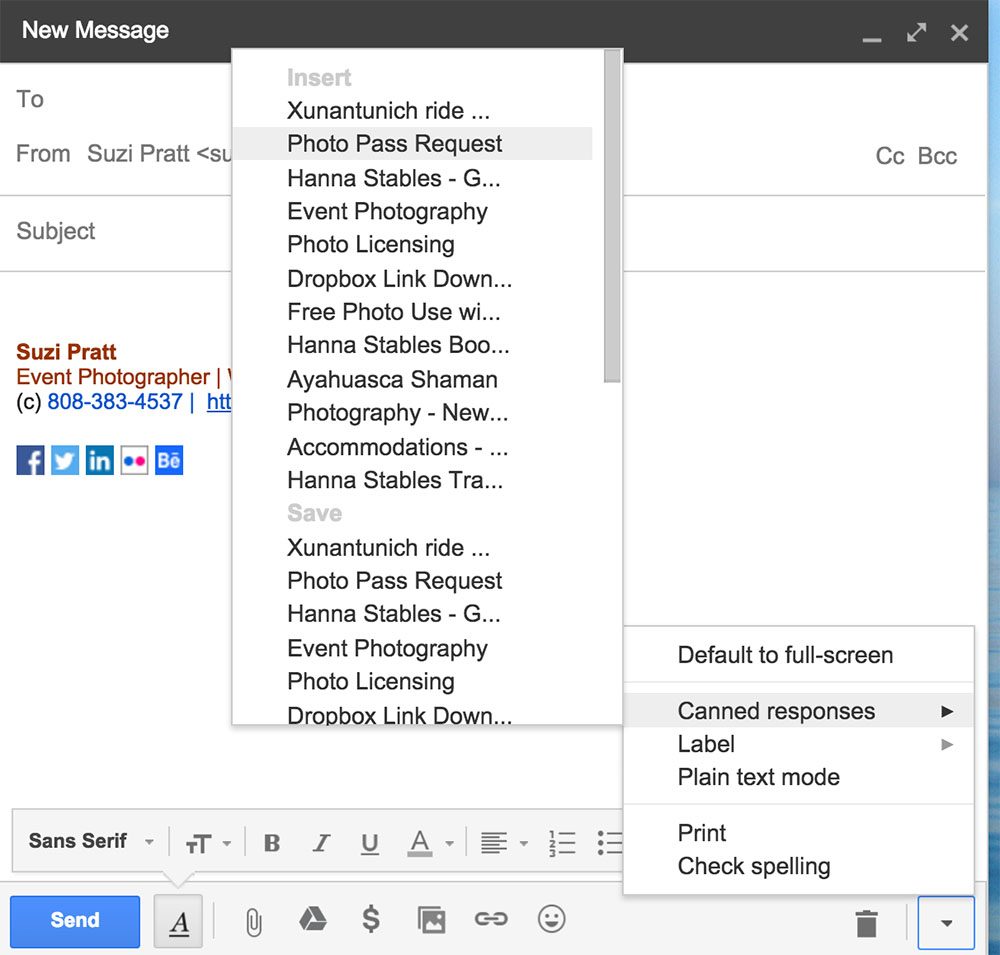
Here are a few scenarios where I used Canned Responses almost daily:
When inquiring about media passes for an event
Often times, obtaining media credentials is as simple as writing a quick email. The emails you send to publicists are pretty much the same; the only parts that change are the names of the artists and venues, and the date of the event. Keep a Canned Response handy and simply insert it when you’re seeking press passes.
When responding to new client inquiries
I make it a priority to respond back to a new client inquiry as soon as humanly possible. Doing so is MUCH faster when I use a Canned Response. I have several that are customized toward the type of client inquiry (ie. one for event photography, one for photo licensing, one for website design, etc), and again only change a few details here and there to personalize the response.
When sending Dropbox links for clients to download images
One caveat I’ve discovered to using Dropbox to share images with clients is that many of them expect the photos to live on those links forever. My point of view on this is that they aren’t paying me for monthly cloud storage, so I’m under no obligation to host their files online for them (and I explicitly put this in every photography contract I sign). However, I also used a Canned Response to kindly remind the client that Dropbox links only work for one week, so they should download the files to their own devices.
Over To You
I’m always looking for other ideas to better manage my crazy inbox. Do you have any other tips or tricks for managing your email inbox? Please share them in the comments below or shoot me an email!